ObjectsAction Programs
Flow Chart Area
In the flow chart area, you can scroll up and down using the mouse wheel, or hold down the mouse wheel and drag to scroll in all four directions. You can also zoom in and out within the area by scrolling the mouse wheel while holding the "Ctrl" key.
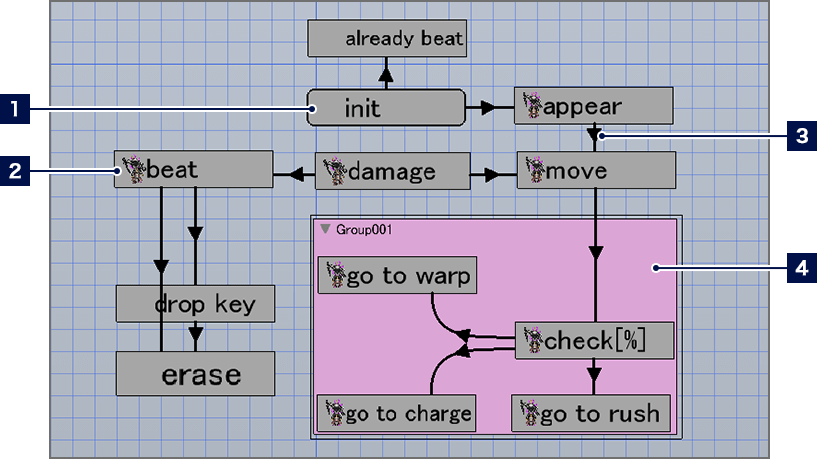
- 1Default Actions
- The first action taken by an object placed in a scene will be displayed in a box with rounded corners. You can change the default action by selecting a box, right-clicking, and selecting "Set Default Action" from the context menu.
- 2Action Boxes
- You can change the size of placed action boxes, or drag them to move them. Boxes configured with motion animations will be displayed in preview on the left.s
- 3Links
- You can select lines by clicking on them, and then drag the ends of them while selected to move them around.
- 4Groups
- Multiple objects can be collected into "Groups" and managed together. You can add an object to a group by selecting and right-clicking a group and selecting "Add to This Group" from the context menu, then clicking the object.
Menu Button Functions
You can use the menu buttons at the bottom of the flow chart area for the following operations.
 Snap to Grid Snap to Grid |
A function that allows you to arrange action boxes and groups following the grid (a lattice of measurement lines). |
|---|---|
 Display/Hide Grid Display/Hide Grid |
Switches between displaying and hiding the grid. |
 Display/Hide Highlighting Display/Hide Highlighting |
When set to display highlighting, when a box or link is selected, the boxes and links connected to it will be highlighted. |
 Toggle Display Toggle Display |
Switches between displaying and hiding the flow component list. |
 Add Group Add Group |
Adds a group to the flow chart. |
 Add Action Box Add Action Box |
Adds an action box to the flow chart. |
 :Delete Item :Delete Item |
Deletes the selected item. |
Action Box Settings
When adding a new action box, either right-click the flow chart area and select "Add Action" from the context menu, or use the menu buttons at the bottom of the area. When an action box is selected, detailed settings will be displayed on the right-hand side of the screen.
Selecting Assigned Animation Actions
You can designate an assigned motion for this action box. When "Inherit Motion Before Transition" is checked, the previously executed motion will be continued.
* You can select a motion to assign from the motions registered in the motion animations using the "Animation" tool.
Runtime Actions
Adjusts basic settings related to actions like jumping and moving.
* When "Enable Custom Jump" is checked, you can modify the strength of the jump by using a different type of button (key) press.
* When "Not Affected by Gravity" is checked, you can set the degree to which gravity has no effect, by percentage. The closer to 0%, the more effect gravity will have.
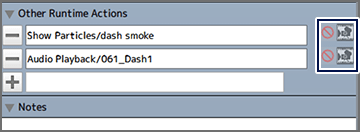
Other Runtime Actions
When you click "+", a registration window will be displayed where you can register various runtime actions. Registered runtime actions can be edited by double-clicking the entry, or deleted by clicking the "-". You can also adjust the following settings by clicking the icons on the right.
 Action ON/OFF Action ON/OFF |
When clicked and set to OFF, the object will not run this action. This setting also applies within the actual game. |
|---|---|
 Changes After Placement ON/OFF Changes After Placement ON/OFF |
When clicked and set to ON, this runtime action can be directly edited from Detailed Object Settings in the "Scenes" tool. |
Link Settings
You can set up a link between two boxes by right-clicking an action box and selecting "Add Link" from the context menu, then selecting another action box. When a link is selected, detailed settings will be displayed on the right-hand side of the screen, and you can set the conditions for toggling actions.
* By setting the "Priority", the action with the large number will be prioritized when multiple actions can be triggered by the same conditions.
Conditions to Toggle Actions
You can set up whether to switch between two actions when certain conditions are met.
When "Toggle If All Conditions Are Met" or "Toggle If Any Condition Is Met" is selected, the action will change in response to the specified condition(s) being achieved.
Input-related Condition Settings
You can set specific input operations (or the lack of such an input) as conditions.
Other Condition Settings
「When you click "+", a registration window will be displayed where you can register various condition settings. Registered condition settings can be edited by double-clicking the entry, or deleted by clicking the "-".
You can also adjust the following settings by clicking the icons on the right.
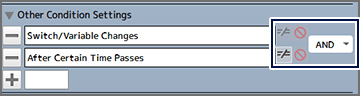
 Condition Flip ON/OFF Condition Flip ON/OFF |
When clicked and set to OFF, the condition settings will be flipped. For example, when "Encounter Attack Detection" is flipped, the applied condition will become "Don't Encounter Attack Detection". |
|---|---|
 Condition Settings ON/OFF Condition Settings ON/OFF |
When clicked and set to OFF, the condition settings will be disabled. This setting also applies within the actual game. |
| AND/OR | When set to AND, both of the set conditions must be met. When set to OR, either of the conditions being met is OK. |
About The Other Actions/Conditions Window
Registration of "Other Runtime Actions" and "Other Condition Settings" can be done in the other actions/conditions window. Select the item you want to set from the list of entries, add a check-mark, and adjust the various settings for it. When "OK" is selected, the checked items will all be registered.
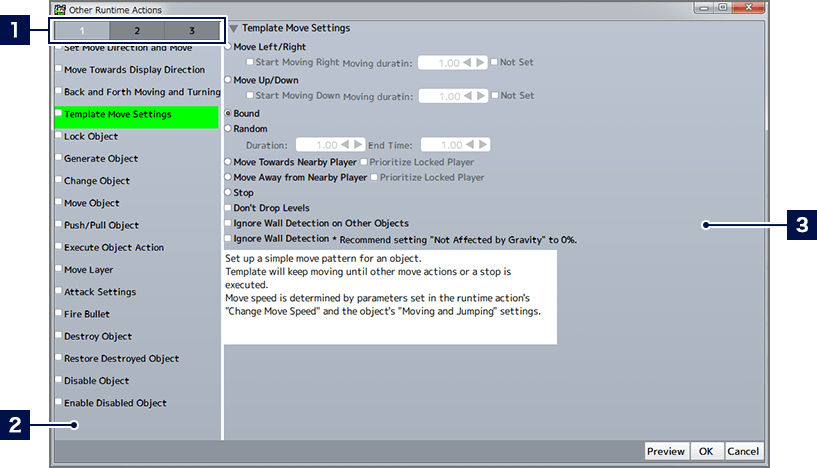
- 1Entry Switching Tabs
- Click here to switch between lists.
- 2Entry List
- 3Detailed Settings for Selected Entry