Getting StartedThe Basics of Game Creation
Elements and Tools That Make Up A Game
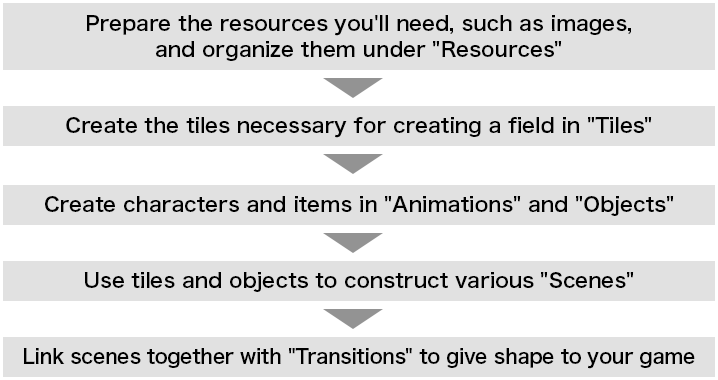
The games you create with this program will be composed of a diverse array of elements, including fields and backgrounds, characters and items, BGM and sounds. These elements can be broken down into multiple categories and managed with support tools within this program. Let's begin with an explanation of each tool.
Resources
To display elements such as fields and characters in your game, you'll need image files to form the basis for each one. You'll also need sound files to use for BGM and sound effects in your game. Depending on the game you're creating, you may also need other items like fonts, video files in formats like .mp4, and animated images in formats like .gif.
These resources will need to be created in other programs (such as Adobe Photoshop for images), then imported to this program. "Resources" is a tool for importing the resources you'll need to create a game and managing them in a unified way.
Tiles
The field (also known as a map) that serves as the setting for your game is created by putting together parts called "tiles". In the Tiles tool, you can manage the images used as tiles, and various elements of each tile, such as wall detection (making tiles impassable), animations, and effects when touched by a character.
Objects
The characters such as protagonists and enemies that move around on the field, as well as the items placed on it and the various gimmicks deployed on it, are all called "objects". The tool that manages their behavior is "Objects".
The behavior of these objects is set using units called "Action Programs". Behaviors such as "move when the direction keys are pressed" for a playable character, or "produce a special effect when touched by a playable character" for an item, can be individually fine-tuned and set using action programs.
Animations
The images used for each object, as well as the detailed animations for each one, are managed under "Animations". For example, movements like "playable character walks to the right" or "item flashes on and off" can be fine-tuned and set using units called "frames". Also, parameters such as the collision detection and attack detection for a character can be set for each frame.
This tool can also be used to manage the effects animation and particle animation for sequences within the game.
Scenes
The tool that actually constructs stages within the game using the tiles and objects you've prepared is called "Scenes". Create a field by placing tiles, and then place objects on top of them. The position and movements of the camera, any behavior that uses physics calculations, and so on, can also be set here.
You can also set up other screens, such as title screens and all kinds of menus, using this tool.
Transitions
The tool that links together the scenes you've created to give shape to your game is called "Transitions". You can set the conditions for transitioning from scene to scene to suit the flow of the game as a whole.
Management of the points ("portals") that can transition players from a scene to another scene can also be done here.
Sample Game Creation Process
There is no fixed process for creating a game. We've presented a relatively orthodox process here, as an example.
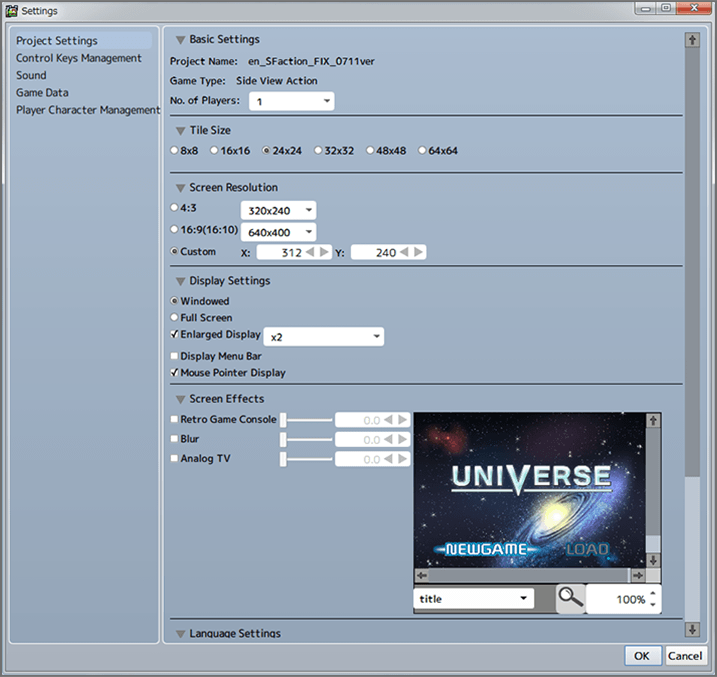
About Basic Settings for Games
Basic settings such as game screen resolution and number of players can be accessed by going to "Settings" → "Project Settings" in the menu bar. Also, in the "Settings" menu, you can access various settings for your game, such as in-game control button settings and sound volume, and settings for each playable character. We recommend individually checking each of these settings before you begin creating a game.
Running A Playtest
You can load data during game creation and run a playtest by pressing the "F5" key in the Editor screen, or by selecting "Test Play" under "Edit" in the menu bar.
While playtesting a game, "Debug Options" will be added to the menu bar, and you'll be able to play with the collision detection and attack detection displayed, use functions like Invincible Mode or Free Movement Mode, or freely select scenes with "Change Scene".
* To display the menu bar on the game screen, you'll need to go to "Settings" → "Project Settings" → "Display Settings" in the menu bar, and check "Display Menu Bar". You can also display the menu bar by pressing "F1" while playtesting.
Creating Play Data
When your game is complete, you should export the data used to play it from the project. Select "File" → "Build Game" in the menu bar, choose a location to output to and a platform, and select "OK" to output play data.